Wednesday, October 28, 2009

Update: Xilinx Simulation

With the recent official release of Windows 7, I decided to update my laptop to 64-bit Windows 7 instead of Vista 32-bit. The process was for the most part, completely painless. But by switching to a 64-bit OS an interesting problem (or more correctly, an annoyance) showed up when trying to simulate some HDL code I have been working on.

It turns out that Xilinx ISE does not have much support for 64-bit asside from generating bit files. When trying to simulate in ISE in 64-bit mode you will notice that you are limited to ModelSIM which I am not that familiar with, but I definiately didn't have much luck with it.

If you are looking to simulate some HDL in the 64-bit ISE, your best chances for success is to use the 32-bit ISE instead. Luckilly, Xilinx was nice and installed the 32-bit programs when you installed 64-bit ISE. Just go to your Program Files Xilinx Folder and locate the 32-bit ISE. It will launch with your current project and settings which makes it a little more bareable when switching between the two ISE programs.

Before you can actually start simulating, you will need to go into your Project settings and change your simulator to ISim (ISE Simulator program). To do this just go to:

Project -> Design Properties -> Simulator -> ISim (VHDL/Verilog)

And your done.

Now if you switch to Behavioral Simulation Mode, you can select your corresponding HDL file you wish to simulate and you will see the "Simulate Behavioral Model" Option appear.

Wednesday, October 14, 2009

Image Processing: Dithering Presentation


Here is another presentation I made a couple years ago for my class in Digital Image Processing. I presented on a very interesting concept called dithering. In this presentation, I discussed several methods of dithering (one of the more interesting methods being "error diffusion"). Check it out.

Dithering Presentation

Hopefully in the near future I will actually post my code for this project, so that people with interest in the topic can play around with the code. My matlab code had support for all the popular, well known, dithering algorithm out there, as well as some more interesting concepts such as image fusion via dithering.

Thursday, October 8, 2009

Matlab FFT Frequency Axis Reconstruction

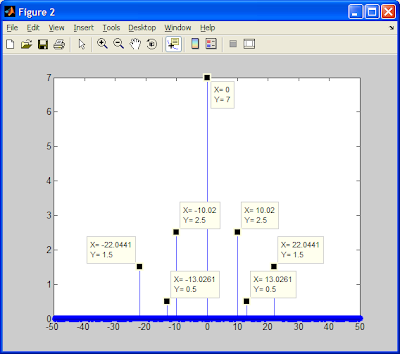
Time and time again, I find myself needing to remember how to accurately reconstruct the frequency axis of an FFT in Matlab. This is one of the ways that I have documented as being a pretty close approximation of the frequency axis. This code will also properly compute the magnitude of each frequency component.

The code below uses the signal below as an example:
y=5*sin(10*2*pi*x)+3*sin(22*2*pi*x)+cos(13*2*pi*x)+7;

Now the Code:
% A simple example of how to reconstruct
% the frequency components from an FFT
%% Clean up the workspace
clear all;
close all;
clc;
%% Create the initial parameters
Window=5; %Set how long in time to sample + and -
Fs=100; %Set the sampling frequency
% Fs should be set atleast 2x max
% frequency in the signal
% With the signal below, the max frequency is
% 22Hz meaning we want to sample atleast at 44Hz
%% Generate the time domain signals
x=-Window:1/Fs:Window; %Create the time signal
y=5*sin(10*2*pi*x)+3*sin(22*2*pi*x)+cos(13*2*pi*x)+7;
% Plot the time domain signal
figure(1);
plot(x,y);
%% Compute and plot the frequency domain signal
figure(2);
% Extract the max frequency that the FFT
% can compute from the Fs we have specified
fmax=Fs/2; %Application of Nyquist Theorem
% Compute the magnitude of the fft of y
N=441;
FFTy=fftshift(abs(fft(y,N)));
% The frequency axis is generated using linspace
f_axix=linspace(-fmax,fmax,N-1);
% Plot the FFT using stem
stem(f_axix,FFTy(2:end)./length(FFTy));


Now the result:


Hope you find this useful.

Monday, October 5, 2009

Eclipse C/C++ IDE File/Folder Restore

Well, I am only human and it was only a matter of time before I slipped and deleted a precious piece of code from my thesis source code folder...I was definitely freaking out because I remembered struggling to get that particular piece of code working the way I needed it.

Luckily Eclipse has a bunch of smart programmers to realize such a case. As you may or may not know, when you delete a file in Eclipse, it does not go into the trash. So if you accidentally delete something in eclipse you might initially think "I am screwed...". Little did I know, I had absolutely nothing to worry about. If you need to restore a deleted file in Eclipse just go to the project's source folder and right click on it and select:

"Restore From Local History..."

You will get a friendly window showing you several restore points for the folder.

Thursday, October 1, 2009

Matlab TightAxis Function

During one of my graduate classes I decided to create a function that makes a window that turns off all the Matlab figure toolbars and makes the axis fill the window AND scales the window to fit the image's native resolution so that no pixilization or aliasing occurs. If the image does not fit in the monitor's native resolution then the function will keep the current window size. When calling the TightAxis function make sure the current axis is the axis you want to modify as I use:
gca

If the axis you are currently interacting with is the one you want to modify just issue the command:
TightAxis(FIGURENAME)

Where FIGURENAME is a string that will be used to label the figure window.
Here is the function:

function TightAxis(title)
%First create an axis if
%the user doesn't have a gca
%and get the handle
haxis=gca;
%Best Image Fit Algorithm
set(gcf,'Visible','off')
set(haxis,'Position',[0,0,1,1])
monitorRes=get(0,'ScreenSize');
imageSize=get(haxis,'PlotBoxAspectRatio');
pos=get(gcf,'Position');
%Check for over sized images
%IF the native resolution of
%the image fits in the screen resolution
%AND the image does not contain a
%1-pixel dimension
%THEN scale the image to be displayed
%at 1x Resolution
if (imageSize(1)<=monitorRes(3)
&& imageSize(1)>1
&& imageSize(2)<=monitorRes(4)
&& imageSize(1)>1)
set(gcf,'Position',[0,0,imageSize(1:2)])
else
set(gcf,'Position',[0,0,pos(3:4)])
end
set(gcf,'Name',title,'NumberTitle','off')
set(gcf,'MenuBar','none')
zoom on;
movegui(gcf,'center')
set(gcf,'Visible','on')