Tuesday, May 25, 2010

Bootloader Emulation

Modifying settings on a boot loader can be somewhat annoying; especially if you are inexperienced at it since you are prone to breaking the bootloader. When a bootloader is broken, often times you are forced to resort to throwing in a LiveCD/DVD and chrooting your filesystem and re-installing a fresh untampered bootloader. This is a time consuming and very annoying process. So...why not run an emulator of your current configuration so that in the event that the bootloader is broken, you know about it before you have to reboot. This allows the user to repair the bootloader in his filesystem rather than chrooting and all that mess that follows.

How do you emulate a bootloader you ask?
Simply download and install "qemu". For sabayon users just:
#equo install qemu


Then when the package is properly installed, run this:
#sync ; echo 3 > /proc/sys/vm/drop_caches ; qemu -hda /dev/sda


This assumes the bootloader is on the MBR. Adjust the command accordingly.

Not too shabby!

Thursday, April 1, 2010

Sabayon Kernel Upgrade Procedure

For those that know me, you probably have heard me talk about Sabayon and praise it for its flexibility, hardware support, good looks, humor (yes humor...see below for a nice April's Fools joke), and most importantly ease of use.
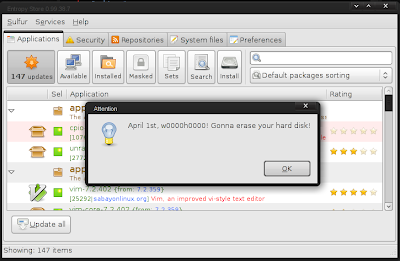

One of the nice things about Sabayon is that the kernel updating is quiet simple, given the complexities involved with the kernel. Below I outline a general procedure to help avoid any headaches one might have when updating their kernel.

1. Grab a list of drivers that will need to be updated:
#equo query installed $(uname -r)

2. Download/Install the kernel:
#equo install sys-kernel/linux-sabayon

3. Install all packages listed in Step 1 (make sure to remove the version info otherwise you will just reinstall the current outdated package)

4. Verify that the kernel is selected:
#eselect kernel list

5. If the new kernel is not selected with '*', set it with:
#eselect kernel set [NUMBER]

6. Also make sure opengl has the correct driver selected with:
#eselect opengl list

7. Correct the opengl selection as needed with:
#eselect opengl set [NUMBER]

8. Make the new kernel the default option in grub (if so desired) by going to /boot/grub/menu.lst

9. Inside menu.lst change "default" to the the corresponding option.

10. It is also a good idea to run a dependency test and library test with:
#equo deptest
#equo libtest

And you should be good to go...NOT SO DIFFICULT IS IT?

Thursday, February 4, 2010

Setting up OpenCV in Eclipse on Windows

IF YOU ARE INSTALLING OPENCV VERSION 2.2 OR LATER PLEASE GO HERE INSTEAD: OpenCV 2.2 GUIDE.

Recently OpenCV 2.0 was officially released. For those looking to do an upgrade to 2.0 (OR LATER) or installing OpenCV for the first time, there are some discrepancies with how older sites say you should setup your environment. I did some file digging and this is what I found works:

First download and setup the basics:
  • Get MinGW
  • Download Eclipse C/C++ IDE
Note: I have a tutorial on these two steps already so just head over HERE for more info.

  • Next download/install OpenCV 2.0 (OR download a more recent version)
  • Now launch Eclipse and start a new project by going to:
  1. File->New->C++ Project (or File->New->C Project)
  2. Give your project a name in the "Project name" box
  3. Select the "Hello World" option under the "Project Type" section under the "Executable" folder. I recommend this over the "Empty Project" as it creates the c/c++ file for you instead of having to do it manually (it also creates a "src" folder and a "Debug" folder which helps keep things a little more organized)
  4. Make sure the "MinGW" Toolchain is selected in the "Toolchains" section
  5. Hit NEXT
  6. Fill in your Author and other file information, then hit NEXT
  7. In the next window select "Advanced settings...". This will bring you to the "Project Settings" which can always be accessed later by going to Project->Properties
  8. Under the "C/C++ Build" Section go to the "Settings" and select the "Tool Settings" Tab. Then select the "Includes" folder (on older versions of eclipse it is the "Directories" folder) in the GCC Compiler branch and add the opencv include directory to Include paths (-I): "C:\OpenCV2.0\include\opencv\". Of course, change C:\OpenCV2.0 to match the installed path that you used.
  9. Now, under the MinGW Linker select the "Libraries" folder and add the following to the Libraries (-l) section (note not all of these are necessarily needed for your project but these are all the libraries available in opencv):
  • cv200
  • cvaux200
  • cxcore200
  • cxts200
  • highgui200
  • ml200
In most cases you will only need cv200 and highgui200 to get started

ALSO NOTE: Versions 2.0 and later postfix the libraries names with a three digit number that corresponds to the version of OpenCV that you are linking to. Example: OpenCV2.1's highgui library must be linked using the name highgui210.

FINALLY, under the "Library search path (-L)" section add:
  • "C:\OpenCV2.0\lib"
  1. Hit OK when done
  2. Hit Finish to create and start the Project
Write up a simple program to test if opencv works properly. You can use this snippet of code I made to test if your video camera and environment are working properly. I would have posted the code here, but blogger is being very difficult with the c++ syntax (i.e. it is trying to read a lot of things as html tags).

If you get an error, during compile time, pertaining to:
__exchange_and_add

Then visit this page and follow the instructions under:
Building on Windows using MinGW 3.4.5

Hope this helps!